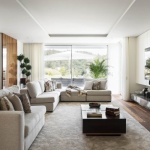
If your living room feels like a sparse waiting room or a cluttered maze, there is a good chance the furniture has been shoved to the perimeter. It is a common instinct: open up the middle, free the floor, and hope the space feels bigger. In reality, wall-hugging is what makes rooms echoey, awkward to converse in, and visually flat. The fix is not buying more pieces or chasing trends. It is learning how to rethink living room furniture layout so the room truly supports conversation, relaxation, and real life.
Below, you will learn the principles behind layouts that work, see multiple fresh configurations for different room shapes, and follow a step-by-step plan to test, tweak, and perfect your setup—without heavy lifting or guesswork. Whether you are working with a small living room, an open plan, or a quirky footprint, these strategies will help you float furniture with confidence and unlock the full potential of your space.
Why Pushing Furniture Against the Walls Fails
Wall-hugging creates problems that are easy to overlook until you fix them. Understanding these pitfalls makes it much easier to justify moving the sofa off the wall and regrouping your seating.
- Acoustic echo and harshness: Bare floors plus large, reflective wall surfaces bounce sound. Floating seating with textural rugs and upholstered pieces improves acoustics dramatically.
- Weak conversation zones: When seats are far apart, talking feels strained or forced. Intimate layouts keep faces within 6–10 feet and angles within a friendly arc.
- Broken traffic flow: Perimeter furniture forces awkward cross-room diagonals or funnels everyone through a single bottleneck near the TV.
- Visual imbalance: A ring of pieces around a void exaggerates the emptiness in the middle and makes the room look smaller, not larger.
- Scale distortion: A long sofa plastered to a long wall makes both feel longer and more imposing, accentuating narrowness and throwing off proportion.
When you stop hugging the walls, you get to control sight lines, conversation distance, and pathways. That is where living rooms start to feel high-function and high-comfort.
Principles That Make Any Living Room Layout Work
Before exploring specific configurations, anchor yourself in a few timeless concepts. These will guide every choice, no matter your style, square footage, or budget.
Start With Purpose and Zones
Instead of asking where the sofa goes, ask what you do here. Typical living rooms juggle multiple jobs: movies, conversation, reading, work, play, hosting, napping. Group related activities into distinct zones. A zone can be as small as a chair and lamp or as large as a sectional and media wall. Give each zone a clear anchor—like a rug, a pendant, or a focal point—and you will instantly reduce clutter and confusion.
- Media zone for TV and gaming
- Conversation zone for hosting and daily catch-ups
- Reading or library nook with a bookcase and task light
- Kids' play zone with storage ottomans and a washable rug
- Work corner with a compact desk or console and a chair
Respect Scale and Proportion
Scale is how big each piece is relative to the room; proportion is how the parts relate to each other. A right-size sofa prevents a domino effect of crowding or sparse holes. If the room is modest, consider a 72–84 inch sofa with armless or tight-back styling, paired with slender accent chairs. For large rooms, a modular sectional or two sofas can maintain proportion without overwhelming the architecture.
- Seat height harmony: Keep seat heights within 1–2 inches of each other for comfort and visual continuity.
- Table-to-sofa ratio: Coffee table length should be about 2/3 the sofa length; height within 1–2 inches of the sofa seat height.
- Rug coverage: Aim for at least the front two legs of seating on the rug to connect pieces and anchor the zone.
Honor Focal Points and Sight Lines
Identify the natural focal point: a fireplace, a window with a view, a media wall, or a statement artwork. Orient your primary seating toward this point. Then consider secondary sight lines—like the route from entry to kitchen, or the view from the dining table—to avoid blocking lines of sight with tall backs or bulky storage.
Design for Traffic Flow
Good circulation is non-negotiable. Lay out walkways that are intuitive and comfortable.
- Leave 30–36 inches for primary pathways, 24–30 inches for secondary routes.
- Keep 14–18 inches from sofa to coffee table for easy reach without knee bumps.
- Allow 3–4 inches between rug edge and furniture legs to avoid tripping edges.
- Place side tables within an arm's reach (roughly 20–24 inches) of each seat.
Layer Your Lighting
Even the best layout suffers in flat light. Use three layers: ambient (overhead), task (reading lamps, picture lights), and accent (wall washers, sconces). Lighting defines zones, creates coziness at night, and highlights focal points. Put as many sources as you can on dimmers, and vary color temperatures for flexibility.
Use Rugs as Anchors
Rugs do the heavy lifting of zoning. They set boundaries, hold furniture together, improve acoustics, and add warmth. In open-plan homes, choose different textures or colors per zone to delineate areas while keeping a coherent palette that ties back to art, throw pillows, or wood tones.
Fresh Living Room Layouts That Actually Work
These layouts are adaptable templates you can customize. Each solves specific challenges and encourages floating furniture away from the walls in smart, livable ways.
1) The Floating Conversation Island
Ideal for rooms with a strong central focal point (like a fireplace) or for square living rooms that feel boxy. Place a sofa and two chairs around a centered rug and coffee table, pulled off all walls by at least 8–12 inches. Add a narrow console table behind the sofa if you need a subtle divider or a spot for lamps.
- Why it works: It brings faces closer for easy talk and pushes traffic around, not through, the conversation area.
- Pro tip: Use identical lamps or a pair of sconces to strengthen symmetry and calm the eye.
2) Dual-Zone Living: Media Plus Conversation
When TV time and hosting both matter, split the room. Float a sectional toward the media wall with a rug anchoring that zone. Behind the sectional, create a slim conversation cluster—two slipper chairs and a small round table, or a bench and pedestal table—on a second rug or a layered runner. The back of the sectional becomes the soft divider.
- Why it works: You avoid a one-note room and make better use of depth.
- Pro tip: Keep the 'back zone' lighter and more vertical so it does not block sight lines from entry points.
3) Library Lounge Nook
Transform a dead corner into a destination. Float a cozy armchair, a floor lamp, and a narrow bookcase perpendicular to the wall, creating a mini alcove. Angle the chair slightly toward the main seating group so it can flex between independent reading and group conversation.
- Why it works: Corners stop feeling wasted; you add function without crowding the main zone.
- Pro tip: A small kilim or sheepskin underfoot adds intimate texture and delineation.
4) Diagonal Layout for Narrow Rooms
In long, skinny rooms, place the sofa at a gentle diagonal aimed at the focal point. Angle one chair to mirror that tilt. This cheat visually widens the room by interrupting the tunnel effect. Use a round coffee table to ease circulation and soften angles.
- Why it works: It breaks up bowling-alley vibes and frees pathways along both sides.
- Pro tip: A rug laid parallel to the longest wall steadies the dynamic angles.
5) Symmetry With a Twist
Flank a fireplace or media wall with twin sofas facing each other, or pair a sofa with two matched lounge chairs. Break perfection with one sculptural accent chair or a unique side table to keep it human, not hotel.
- Why it works: Symmetry relaxes the brain by making visual math easy.
- Pro tip: If you entertain often, ensure 36 inches at the sofa ends so trays and guests can pass without contortions.
6) L-Shaped Sectional as a Soft Divider
Float an L-shaped sectional in open-concept spaces to carve out a cozy living zone from a dining or kitchen area. Let the chaise side point to the view or anchor point, with a console table tucked behind the long back for drop-zone function.
- Why it works: The sectional replaces walls by forming a hug around the conversation area.
- Pro tip: Add a swivel chair across the open side so the arrangement adapts to both media viewing and chatting with people in the kitchen.
7) Curved Sofa in a Bay Window
Curved pieces shine in rooms with radius walls or generous windows. Float a curved sofa several inches off the baseboards to echo the architecture and invite movement around it. Pair with a round or oval coffee table and a low-profile rug.
- Why it works: Curves smooth circulation and keep sight lines fluid.
- Pro tip: A semi-flush or chandelier centered on the curve completes the rhythm.
8) Open-Plan Living–Dining Hybrid
When one large space does it all, think like a city planner. Use area rugs as 'districts,' align major pieces to a common axis, and leave a 36-inch promenade connecting entries. Float the sofa so its back faces the dining area, and put a narrow console with lamps behind it to create a glow that visually walls the living zone.
- Why it works: Zoning fights echo and visual chaos while keeping the plan airy.
- Pro tip: Keep dining chairs lightweight enough to pull into the living zone during parties.
9) Small Living Room, Big Feel
In compact spaces, switch bulk for agility. Float a loveseat, add a petite swivel, and use nesting tables instead of one big coffee table. Choose a wall-mounted media unit and a floating shelf to raise storage off the floor and let more rug show.
- Why it works: Air under and around furniture makes a small room feel generous.
- Pro tip: Use a single, generously sized rug. Tiny rugs chop up the floor and make the room read smaller.
10) Family-First Flex Layout
Float a deep sofa and a pair of ottomans that double as a coffee table. Ottomans slide aside for yoga, kids' forts, or game night. Tuck a bench under a window for extra perch seating. Everything earns its keep with storage and soft edges.
- Why it works: Pieces adapt to multiple activities without a daily puzzle.
- Pro tip: Use performance fabrics and washable slipcovers to lean into real life.
11) Studio Apartment Zoning
When your living room is also your bedroom, line up function like layers. Headboard wall, then the bed, then a narrow console acting as a 'footboard' divider, then a compact sofa facing a wall-mounted TV. Each layer gets its own rug edge or runner to telegraph zones without walls.
- Why it works: Layers give privacy and purpose without blocking light.
- Pro tip: Swivel chairs let you pivot between a desk and living zone effortlessly.
How to Rethink Living Room Furniture Layout: A Step-by-Step Plan
Here is a practical, repeatable path to a better arrangement—whether you are starting from zero or refreshing what you have.
Step 1: Clarify Activities
List what actually happens in your living room over a week. TV marathons? Board games? Remote work? Sketch simple bubbles for each activity. This is how you begin to rethink living room furniture layout from purpose, not habit.
Step 2: Measure the Envelope
Measure wall-to-wall length and width, ceiling height, window and door placements, radiators, and outlets. Note where doors swing and how wide. Photograph the room from each corner. These constraints steer choices and save you from expensive mistakes.
Step 3: Draw a To-Scale Plan
Use graph paper or a free app to draw the shell to scale. Cut paper templates for your furniture (or create digital blocks). Include rugs and tables. Move templates around with zero sweat equity.
Step 4: Choose Your Focal Point
Decide which focal point wins—media, fireplace, view, or art. In multipurpose rooms, let the main zone own the prime focal, with a secondary focal for the second zone (like a gallery wall for a reading corner).
Step 5: Float the Big Piece
Place the sofa first, off the wall if possible. Aim for a position that serves the focal point and maintains good traffic along one or two predictable routes. This single move often solves 60% of layout problems.
Step 6: Balance With Chairs
Add one or two accent chairs to complete the conversation circle. Swivels are MVPs: they pivot between media and conversation zones without dragging furniture around.
Step 7: Anchor With a Rug
Pick a rug large enough that at least front legs land on it. The rug stitches everybody into a team, reduces echo, and visually declares, 'this is the living zone.'
Step 8: Dial In Surfaces
Add a coffee table and side tables so every seat has a reachable surface for mugs and remotes. In tighter rooms, use nesting tables or a storage ottoman with a tray. Keep clearances in the 14–18 inch reach zone.
Step 9: Light Like a Stage
Layer ambient, task, and accent light. Table lamps near seating, a floor lamp in the corner, and a dimmable overhead create flexibility from movie night to reading hour.
Step 10: Style and Edit
Add throws, pillows, and art to warm things up. Then remove one item. Editing is the final polish that keeps a fresh layout from feeling overworked.
Common Mistakes to Avoid
- Buying the sofa first: Locking into an oversize piece boxes you in. Define zones, then size the sofa.
- Tiny rugs: Underscaled rugs make furniture look like it is floating awkwardly at sea.
- Wall-hugging everything: It sabotages conversation and proportion.
- Ignoring sight lines: Tall backs blocking windows or entries make rooms feel cramped.
- Tables too far away: If you cannot set down a drink without leaning, your layout is not done.
- One-note lighting: Overhead glare flattens mood and color.
Styling and Finishing Touches That Support the Layout
Great layouts look even better with thoughtful styling. Use accessories to reinforce the zones you have created and soften the edges.
- Textile cohesion: Choose a palette of 3–5 tones repeated across pillows, throws, and rugs to unite zones without monotony.
- Visual weight distribution: Balance a large sectional with a big art piece or a tall plant on the opposite side.
- Greenery as soft dividers: Use a tall ficus or olive tree to signal a boundary between living and dining without adding bulk.
- Mirrors with intention: Bounce light into darker corners, but avoid reflecting clutter or the TV from multiple angles.
- Hidden storage: Storage ottomans, media consoles with doors, and baskets keep surfaces clear so your zoning reads cleanly.
Three Mini Case Studies
Case 1: The Long, Narrow Rental
Problem: A 10x20 foot space with a big window at one end and the entry at the other. The sofa on the long wall created a corridor and made guests shout across the room.
Solution: A loveseat floated on a rug in the front half, facing a wall-mounted TV. A round coffee table improved flow. A slim bench along the window acted as extra seating. A petite reading chair at a diagonal completed the social triangle. Result: Better acoustics, defined pathways on both sides, and a room that felt wider.
Case 2: Open Concept With Kitchen Views
Problem: A cavernous space read as one echoey rectangle. The sectional was jammed against a back wall, making the area feel like a rec room.
Solution: The sectional floated perpendicular to the kitchen island, turning its back into a soft divider. A console table with lamps reinforced the boundary. Behind the sectional, two slipper chairs formed a micro conversation spot. Result: Clear zones, calmer acoustics, and a more refined, intentional living area.
Case 3: Small Family Room, Many Jobs
Problem: Toys migrated everywhere, and the coffee table was a shin-banger.
Solution: Swapped the coffee table for two upholstered ottomans with trays. Added a storage bench under the window and a washable 8x10 rug to anchor the arrangement. A floor lamp and a sconce layered light for reading. Result: Flexible play space on demand and a softer, safer circulation path.
Quick Measurements and Formulas
- Primary pathway width: 30–36 inches
- Secondary pathway width: 24–30 inches
- Sofa-to-coffee reach: 14–18 inches
- TV viewing distance: Screen size (inches) x 1.2 to 1.5 = ideal inches away
- Rug sizing: Leave 6–12 inches of bare floor between rug and walls; ensure front legs of all major pieces touch the rug
- Side table height: Within 2 inches of the adjacent arm height
- Lighting: Place lamp shades at or just below eye level when seated to avoid glare
FAQs About Rethinking Your Living Room Layout
Do I have to float all my furniture?
No. Float the main group if you can; a single wall-based element like a console or bookcase is often practical. The goal is to create zones that support conversation and traffic, not a rule-bound museum.
What if my room is too small to float the sofa?
Float the chairs and tables instead. Even a 6–8 inch gap between the sofa and the wall can visually 'float' it and improve proportion. Use armless or slim-armed pieces to gain inches.
How do I handle a fireplace and a TV?
If they share a wall, mount the TV slightly lower than you think and angle lounge chairs to relieve neck strain. If they are on different walls, choose one as dominant and swivel chairs to serve both focal points on different occasions.
How can I make an open concept feel cozy?
Rugs, lighting layers, and furniture backs-as-dividers. Repetition of materials—like the same wood tone in shelves, dining chairs, and a console—knits the zones into a whole.
What is the fastest way to test a new arrangement?
Painter's tape. Outline rug edges, sofa footprints, and pathways on the floor. Live with it for a day, then move the actual pieces once you are convinced.
Before You Move Anything: Your Rethink Kit
- Measuring tape for accurate dimensions
- Graph paper or a layout app for to-scale planning
- Painter's tape to mock up rug and furniture footprints
- Sliders or towels to protect floors when moving pieces
- Rug pad for stability and acoustic improvement
- Dimmers and bulbs to tune light layers
Putting It All Together
The secret to a better living room is not more furniture or trend-chasing. It is deciding what the room should do for you, then arranging a few well-chosen pieces to support that purpose. When you rethink living room furniture layout through the lenses of zones, sight lines, and circulation, the room becomes intuitive to use and inviting to be in. Float a key piece. Anchor with a rug. Layer the light. Edit with intention. That is how you turn a wall-hugging space into a satisfying, social, and stylish everyday retreat.
Start small: tape out a new rug size, nudge the sofa off the wall, or swap a bulky table for nesting ones. One thoughtful change leads to another, and before long, your living room will not just look better—it will finally work.